Vitis AI on Zynq Ultrascale+ MPSoC
Vivado Hardware Design for Deep Learning Unit
This section is part of a series focused on utilizing the DPUCZDX8G Deep Learning Processor Unit (DPU), a programmable engine optimized for convolutional neural networks (CNNs), within the Vitis AI environment. In this section, I will describe the process of integrating the DPU with configuration B1152 into a Vivado hardware design for the Zynq UltraScale+ 2CG device. The setup used includes the Trenz Module TE0820-03-2AI21FA (ZU+ 2CG) and the TE0703-06 carrier board.
This series covers key steps for enabling efficient AI acceleration on embedded platforms, including:
By following this guide, can be gained practical insights into designing, deploying, and running AI workloads on Zynq UltraScale+ MPSoCs using Vitis AI.
All sources are available for free into my repository. The repository consists of example for to ZU+ devices (2CG and 4EV, Trenz modules TE0820-03-2AI21FA and TE0820-05-4DE21MA) and allows to create Vivado Hardware Design and deploy Linux by using Petalinux for Vitis AI enviroment.
The structure of the repository:
board/ - Vivado block design and project configuration tcl
petalinux/ - Petalinux project configuration
ip/ - DPU IP core sources
scripts/ - some helper scripts
My host enviroment:
1. Ubuntu 20.04 on WSL2
2. Vitis 2022.2 installed in Ubuntu 20.04
3. Petalinux 2022.2
4. Vitis AI 3.0 repository
5. DPU DPUCZDX8G IP core
How to start. Clone the repository and build Vivado project for te0820-2cg board. Hardware deisgn Xilinx support archive (xsa) for Linux deployment with Petalinux will be exported into folder build/

The following figures show the configuration page of the DPUCZDX8G.


Number of DPU cores is 1 with low RAM usage. For power consumption reducing dpu_2x clock Gating is enable. Amount of resources and AXI port configuration is depicted on the Summary tab. Because of the Softmax function enabled the amount of DSP Slices and RAM blocks is higher than pointed for B1152 architecture, but still feasable for integration on ZU+ 2CG devices.
[host]:~$ git clone https://github.com/farbius/edu-vitis-ai

[host]:~$ cd edu-vitis-ai

[host]:~/edu-vitis-ai$ make te0820-2cg-xsa
The DPUCZDX8G IP core supports one AXI slave interface for accessing configuration and status registers, and AXI master interfaces for instruction and data fetch. To optimize performance, all interfaces should be directly connected to the Processing System (PS), when possible, to minimize latency and maximize data throughput.
Xilinx Recommendations for optimal DPUCZDX8G integration:
Direct Connections to PS: Connect each master interface of the DPUCZDX8G directly to the PS instead of using an AXI Interconnect IP, provided there are sufficient AXI slave ports on the PS.
Instruction Fetch Interface: All master ports responsible for instruction fetching should connect to the S_AXI_LPD of the PS, either directly or via an AXI interconnect (if only one master port is present).
Data Fetching Ports: To ensure high bandwidth, the master ports used for data fetching should be directly connected to the PS whenever possible.
Port Prioritization: Master ports with higher priority (such as DPU0, which has a smaller port number) should be connected to higher-priority slave ports on the PS (like S_AXI_HP0_FPD), to ensure efficient data access.
Slave Interface Connection: The AXI slave port of the DPUCZDX8G should be connected to the M_AXI_HPM0_LPD of the PS to manage register access efficiently.
Below is an example of the hardware design for the Zynq UltraScale+ 2CG device. The DPUCZDX8G IP requires three input clocks, each with a corresponding reset signal. It’s important to ensure that each reset is synchronous to its respective clock to maintain proper system operation.

DPU configuration. Different configurations can be selected for DSP slices, LUT, block RAM, and UltraRAM usage based on the amount of available programmable logic resources. In ZU+ 2CG device 150 RAM blocks, 240 DSP Slices and no UltraRAM blocks are available. Therefore DPUCZDX8G IP with B1152 architecture can be fitted.
Clock Wizard for DPU. A DSP Double Data Rate (DDR) technique may be used to used to improve the performance achieved with the DPU. In this configuration, two input clocks for the DPUCZDX8G are needed: A 1x clock for general logic and a 2x clock for DSP slices are employed. dpu_2x clock gating is an option for reducing the power consumption of the DPUCZDX8G. ZU+ 2CG device uses three clocks for DPUCZDX8G: 100 MHz for AXI Slave port, 325 MHz for AXI master ports and 650 MHz gated clock for DSP.

Address space. The minimum space needed for the DPUCZDX8G is 16 MB. The DPUCZDX8G slave interface can be assigned to any starting address accessible by the host CPU.

Conclusion. The proposed Vivado hardware design, tailored for the Vitis AI Vivado flow, integrates the DPUCZDX8G IP core with architecture B1152, specifically optimized for Zynq UltraScale+ MPSoC (ZU+ 2CG) devices. This design enables efficient acceleration of AI workloads on the programmable logic, leveraging the high-performance DPU core for deep learning inference. By utilizing the Vitis AI stack, the hardware accelerates AI model deployment, offering seamless integration with the software development flow while achieving optimal performance on embedded platforms.
Linux deployment for Vitis AI environment
This section is part of a series focused on utilizing the DPUCZDX8G Deep Learning Processor Unit (DPU), a programmable engine optimized for convolutional neural networks (CNNs), within the Vitis AI environment. In this section, I will describe the process of deployment Linux for the Zynq UltraScale+ 2CG device with Vitis AI library. The setup used includes the Trenz Module TE0820-03-2AI21FA (ZU+ 2CG) and the TE0703-06 carrier board.
This series covers key steps for enabling efficient AI acceleration on embedded platforms, including:
By following this guide, can be gained practical insights into designing, deploying, and running AI workloads on Zynq UltraScale+ MPSoCs using Vitis AI.
All sources are available for free into my repository. The repository consists of example for to ZU+ devices (2CG and 4EV, Trenz modules TE0820-03-2AI21FA and TE0820-05-4DE21MA) and allows to create Vivado Hardware Design and deploy Linux by using Petalinux for Vitis AI enviroment.
The structure of the repository:
board/ - Vivado block design and project configuration tcl
petalinux/ - Petalinux project configuration
ip/ - DPU IP core sources
scripts/ - some helper scripts
My host enviroment:
1. Ubuntu 20.04 on WSL2
2. Vitis 2022.2 installed in Ubuntu 20.04
3. Petalinux 2022.2
4. Vitis AI 3.0 repository
5. DPU DPUCZDX8G IP core
How to start. Since Vivado project is completed and sys_wrapper.xsa file is available in directory build/, Petalinux project can be started.
[host]:~/edu-vitis-ai$ make te0820-2cg-lin
Petalinux configuration. Project configuration window will be opened. For project configuration should be the following settings specified:
for accelerating petalinux build (optional: this step can be missed if local copies of the software package downloads is present)
Yocto Settings ---> Add pre-mirror url --->file:///home/user-name/petalinux/2022.2/downloads
where file:///home/user-name/petalinux/2022.2/downloads is the path to software package downloads
for accelerating petalinux build (optional: this step can be missed if local copies of the software package sstate cache is present)
Yocto Settings ---> Local sstate feeds settings ---> /home/user-name/petalinux/2022.2/aarch64
where /home/user-name/petalinux/2022.2/aarch64 is the path to software package sstate cache
package configuration for Image (microSD card is mmbclk1p2 in Trenz module TE0820-03)
Image Packaging Configuration ---> Root filesystem type ---> EXT4 (SD/eMMC/SATA/USB)

Image Packaging Configuration ---> Device node of SD device (NEW) ---> /dev/mmcblk1p2

Image Packaging Configuration ---> Copy final images to tftpboot ---> uncheck
devicetree default kernel arguments
DTG Settings--->Kernel Bootargs ---> generate boot args automatically ---> uncheck

DTG Settings--->Kernel Bootargs ---> user kernel bootargs ---> earlycon console=ttyPS0,115200 clk_ignore_unused root=/dev/mmcblk1p2 rw rootwait cma=512M
static IP address for Ethernet
Subsystem AUTO Hardware Settings ---> Ethernet Settings ---> Obtain IP address automatically (uncheck)

Subsystem AUTO Hardware Settings ---> Ethernet Settings ---> Static IP address (192.168.1.123)

Subsystem AUTO Hardware Settings ---> Ethernet Settings ---> Static IP gateway (192.168.1.1)
Rootfs configuration. Change directory to petalinux project and call rootfs configuration menu.
[host]:~/edu-vitis-ai$ cd build/te0820-2cg-lin

[host]:~/edu-vitis-ai/build/te0820-2cg-lin$ petalinux-config -c rootfs
Following settings should be set:
user packages enabling
user packages ---> checking out all packages excluding vitis-ai-library-dbg and vitis-ai-library-dev
enabling resnet50 vitis-ai example
apps ---> resnet50
enabling ssh-server instead of dropbear
Image Features ---> ssh-server-dropbear ---> uncheck

Image Features ---> ssh-server-openssh ---> check

Image Features ---> package-management ---> check

Filesystem Packages ---> console ---> network ---> openssh ---> check (openssh, openssh-sftp-server, openssh-sshd, openssh-scp)

Filesystem Packages ---> misc ---> packagegroup-core-ssh-dropbear ---> packagegroup-core-ssh-dropbear ---> uncheck
Vitis AI packages for Petalinux project were added from DPUCZDX8G_VAI_v3.0.tar.gz archive.
After unziping the archive, all folders from DPUCZDX8G_VAI_v3.0/prj/Vivado/sw/meta-vitis were copied into project-spec/meta-user/.
The file project-spec/meta-user/conf/user-rootfsconfig was edited as follows:

Petalinux build. Start building petalinux project
[host]:~/edu-vitis-ai/build/te0820-2cg-lin$ petalinux-build
Generate BOOT.BIN file
[host]:~/edu-vitis-ai/build/te0820-2cg-lin$ cd images/linux

petalinux-package --boot --fsbl zynqmp_fsbl.elf --u-boot u-boot.elf --pmufw pmufw.elf --fpga system.bit --force
Generate partitioned images for microSD card (also zipped image can be created with appending --wic-extra-args "-c gzip" )
[host]:~/edu-vitis-ai/build/te0820-2cg-lin$ cp ../../scripts/mmcblk1.wks images/linux

petalinux-package --wic --wks images/linux/mmcblk1.wks --rootfs-file images/linux/rootfs.tar.gz --bootfiles "BOOT.BIN image.ub boot.scr"
Partitioned image petalinux-sdimage.wic or petalinux-sdimage.wic.gz will be created. The image can be flashed into a microSD card by using for example balenaEtcher software. After booting Linux from SD on TE0820-03-2AI21FA + TE0703-06 console output should look like:


Conclusion. Here was outlined the step-by-step process of deploying Linux for the Vitis AI environment on a Zynq UltraScale+ 2CG device, using the Trenz TE0820-03-2AI21FA module and TE0703-06 carrier board. By leveraging PetaLinux as part of the Vivado flow for Vitis AI, this setup enables the efficient deployment of AI workloads on embedded systems. The provided information can be easily adapted for other custom Zynq UltraScale+ devices by using packages from DPUCZDX8G_VAI_v3.0.tar.gz.
Vitis AI Library Examples
This section is part of a series focused on utilizing the DPUCZDX8G Deep Learning Processor Unit (DPU), a programmable engine optimized for convolutional neural networks (CNNs), within the Vitis AI environment. Here, I will demonstrate how to use the Vitis AI neural network libraries, based on the TensorFlow framework, for practical AI applications. As examples, ResNet50 for image classification and YOLOv3 for object detection from the Vitis AI Model Zoo are used. All tests are conducted on the Trenz TE0820-03-2AI21FA (ZU+ 2CG) module with the TE0703-06 carrier board, using a connected Logitech C270 USB camera.
This series covers key steps for enabling efficient AI acceleration on embedded platforms, including:
By following this guide, can be gained practical insights into designing, deploying, and running AI workloads on Zynq UltraScale+ MPSoCs using Vitis AI.
All sources are available for free into my repository. The repository consists of example for to ZU+ devices (2CG and 4EV, Trenz modules TE0820-03-2AI21FA and TE0820-05-4DE21MA) and allows to create Vivado Hardware Design and deploy Linux by using Petalinux for Vitis AI enviroment. The structure of the repository:
board/ - Vivado block design and project configuration tcl
petalinux/ - Petalinux project configuration
ip/ - DPU IP core sources
scripts/ - some helper scripts
My host enviroment:
2. Vitis 2022.2 installed in Ubuntu 20.04
3. Petalinux 2022.2
How to start. Since Linux is booted X11 forwarding (SSH protocol) can be used for running graphical applications on the target.
[host]:~/edu-vitis-ai$ ssh -X root@192.168.1.123
Firstly let’s check that DPU IP core is initialized by using xdputil tool
[target]:~# xdputil query
The output provides device information, including DPU, fingerprint, and Vitis AI version

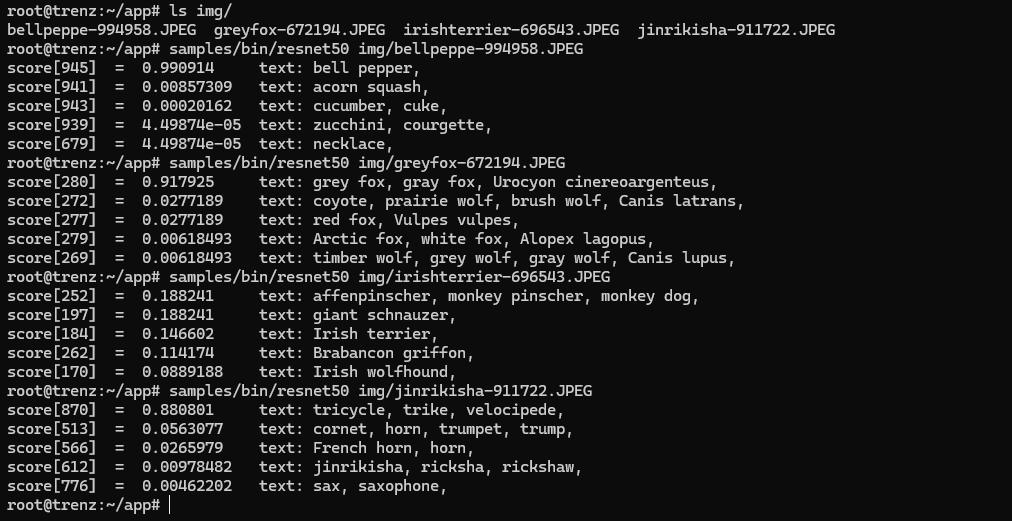
Runing pre-trained ResNet50 example. In rootfs there is already pre-trained and compiled version of ResNet50 CNN for image classification. In order to run the example compiled and optimized file of deep learning model should be copied. Afterwards The example can be executed by using the model and one of the images in img/ folder
[target]:~# cd app

[target]:~/app# cp model/resnet50.xmodel .

[target]:~/app# samples/bin/resnet50 img/bellpeppe-994958.JPEG
Expected failure appears, warning about wrong fingerprint for the model. The model was compiled for DPU B4096 architecture, but in 2CG device B1152 architecture is utilized.

Re-compiling ResNet50 xmodel for B1152 architecture. Re-compiling existing xmodel requires Vitis AI 3.0 version and Docker for WSL2. and done by leveraging prebuilt Vitis AI Docker container vitis-ai-tensorflow-cpu. Also arch.json file, that consists of information about integrated DPU, should be copied into Vitis AI/. The file will be used for model re-compilation.
[host]:~$ git clone -b 3.0 https://github.com/Xilinx/Vitis-AI.git

[host]:~$ cd Vitis-AI/

[host]:~Vitis-AI/$ cp ~/edu-vitis-ai/build/te0820-2cg-xsa/top.gen/sources_1/bd/sys/ip/sys_dpuczdx8g_0_0/arch.json .

[host]:~Vitis-AI/$ docker pull xilinx/vitis-ai-tensorflow-cpu:latest

[host]:~Vitis-AI/$ ./docker_run.sh xilinx/vitis-ai-tensorflow-cpu:latest
The output screen should be like on the picture below

For re-compilation ResNet50 the quantized model of ResNet50 is required. The link for downloading quantized model can be found in model.yaml file, that is placed in Vitis-AI/model_zoo/model-list/ for appropriate framework and pre-trained CNN. In case of ResNet50 for image classification tf_resnetv1_50_imagenet_224_224_6.97G_3.0/model.yaml is utilized.
[docker]:workplace$ wget https://www.xilinx.com/bin/public/openDownload?filename=tf_resnetv1_50_imagenet_224_224_6.97G_3.0.zip -O tf_resnetv1_50.zip

[docker]:workplace$ unzip tf_resnetv1_50.zip

[docker]:workplace$ cd tf_resnetv1_50_imagenet_224_224_6.97G_3.0/
File of quantized model is quantized_baseline_6.96B_919.pb. The file will be used in order to re-compile ResNet50 xmodel for current DPU configuration by utilizing copied earlier arch.json file. Re-compiled model will be stored in out/ directory and should be copied on the target.
[docker]:workplace/tf_resnetv1_50_imagenet_224_224_6.97G_3.0$

vai_c_tensorflow --arch ./../arch.json -f quantized/quantized_baseline_6.96B_919.pb --output_dir out -n resnet50

[docker]:workplace/tf_resnetv1_50_imagenet_224_224_6.97G_3.0$ scp out/resnet50.xmodel root@192.168.1.123:~/app

After runing the application one more time with updated resnet50.xmodel, the output for different images should be
Object detection with YOLOv3 and USB Camera. Object detector YOLOv3 is implemented by using Tensorflow framework. Sources to download are listed in Vitis-AI/model_zoo/model-list/tf_yolov3_voc_416_416_65.63G_3.0/model.yaml file. Should be downloaded quantized model and xmodel for zcu102 & zcu104 & kv260. Also package vitis_ai_library_r3.0.x_images.tar.gz for examples is required.
[host]:~Vitis-AI/$ wget https://www.xilinx.com/bin/public/openDownload?filename=tf_yolov3_voc_416_416_65.63G_3.0.zip -O yolov3.zip

[host]:~Vitis-AI/$ wget https://www.xilinx.com/bin/public/openDownload?filename=yolov3_voc_tf-zcu102_zcu104_kv260-r3.0.0.tar.gz -O yolov3.tar.gz

[host]:~Vitis-AI/$ wget https://www.xilinx.com/bin/public/openDownload?filename=vitis_ai_library_r3.0.0_images.tar.gz -O vitis_ai_library_images.tar.gz

[host]:~Vitis-AI/$ ./docker_run.sh xilinx/vitis-ai-tensorflow-cpu:latest
All three archives yolov3.zip, yolov3.tar.gz and vitis_ai_library_images.tar.gz will be unzipped in the docker container. After unzipping vitis_ai_library_images.tar.gz folder samples/yolov3 appears with images for testing yolov3 detector. Content of the folder should be copied into example/ folder to the sources of the YOLOv3 detector and archive for the target will be created.
[docker]:workplace$ unzip yolov3.zip

[docker]:workplace$ tar -xzvf yolov3.tar.gz

[docker]:workplace$ tar -xzvf vitis_ai_library_images.tar.gz

[docker]:workplace$ cp -r samples/yolov3/* examples/vai_library/samples/yolov3/

[docker]:workplace$ tar -czvf yolov3_target.tar.gz -C examples/vai_library/samples/yolov3/ .
Re-compiling YOLOv3 detector for B1152 DPU architecture. The process of recompiling quantized model for Tensorflow framework is the same as for ResNet50. The model out/yolov3_voc_tf.xmodel will be created. Afterwards the archive yolov3_target.tar.gz, re-compiled model and prototxt config file will be copied on the target
[docker]:workplace$ cd tf_yolov3_voc_416_416_65.63G_3.0/

[docker]:workplace/tf_yolov3_voc_416_416_65.63G_3.0$

vai_c_tensorflow --arch ./../arch.json -f quantized/quantize_eval_model.pb --output_dir out -n yolov3_voc_tf --options "{'input_shape':'1,416,416,3'}"

[docker]:workplace/tf_yolov3_voc_416_416_65.63G_3.0$ scp out/yolov3_voc_tf.xmodel ../yolov3_voc_tf/yolov3_voc_tf.prototxt root@192.168.1.123:~

[docker]:workplace/tf_yolov3_voc_416_416_65.63G_3.0$ scp ../yolov3_target.tar.gz root@192.168.1.123:~
Runing YOLOv3 detector examples. On the target sources for YOLOv3 detector example from the archive should be unzipped and compiled (compiling takes some time). Examples for YOLOv3 detector can be executed.
[target]:~# tar -xzvf yolov3_target.tar.gz -C ~/

[target]:~# chmod +x build.sh

[target]:~# ./build

[target]:~# ./test_jpeg_yolov3 yolov3_voc_tf.xmodel sample_yolov3.jpg

For Logitech C270 USB camera
[target]:~# ./test_video_yolov3 yolov3_voc_tf.xmodel 0 -t 2

Conclusion. In this section, was demonstrated the execution of two key examples from the Vitis AI Model Zoo: ResNet50 for image classification and YOLOv3 for object detection. Both models were recompiled to support the DPUCZDX8G IP core with the B1152 architecture, instead of the default B4096, and were deployed on the Trenz TE0820-03-2AI21FA module with the TE0703-06 carrier board. This guide provides a step-by-step approach to running Vitis AI models on a custom hardware setup, but the principles and procedures outlined can be applied to any other Zynq UltraScale+ (ZU+) devices. By following this process, users can easily adapt different models from the Vitis AI Model Zoo or custom-trained models to their specific hardware configurations for efficient AI acceleration.
Object Detection with OFA-YOLO

This section focuses on the Python implementation of the OFA-YOLO network from the Vitis AI 3.0 Model Zoo for real-time object detection, specifically optimized to run on the DPUCZDX8G Deep Learning Processing Unit (DPU). Utilizing Python, I present a robust implementation of a Python class that integrates several essential functionalities, including image preprocessing, data inference, and parsing of the network’s output with non-maximum suppression. Additionally, performance metrics are provided, comparing the results from both the full and pruned versions of the network.
The accuracy of the object detection model is evaluated using the COCO dataset, with performance metrics derived through the pycocotools library. In addition to accuracy, I provide throughput benchmarks by evaluating multithreaded video stream processing in the Python implementation. For comparison, throughput results are also presented for the C++ implementation from the Xilinx Vitis AI 3.0 GitHub repository.
All tests are carried out on a Trenz TE0820-03-2AI21FA (ZU+ 2CG) module mounted on a TE0703-06 carrier board, with a Logitech C270 USB camera used for capturing video streams. The prerequisites for these tests include a Linux environment with Vitis AI 3.0 libraries already integrated and properly configured. For step-by-step guidance, check out the previous pages of the website:
All resources, including the optimized Python class for the OFA-YOLO network, the multithreading Python implementation for enhancing real-time object detection, the script for accuracy estimation, and the README markdown file, are available as paid content. Recompiled xmodels for the B1152 DPU architecture also are provided.
To accelerate your Deep Learning journey on Zynq Ultrascale+ MPSoCs, feel free to contact me to obtain the sources with a small donation. Alternatively, you can do optimizations yourself using the free, non-optimized Python script of OFA-YOLO implementation available on this webpage.

To better understand how to leverage the OFA-YOLO network deployed on the DPU, let’s consider the design of YOLOv3, focusing on its input image preprocessing and the parsing and decoding of its output layers. The input image for the OFA-YOLO network is a normalized and scaled image with dimensions 640x640x3. The network produces three output layers with different dimensions (20x20, 40x40, 80x80) for detecting small, medium, and large objects. Each output layer contains three prediction boxes, corresponding to three anchors. This results in 255 values for each of the three boxes per grid cell in the output layer: four bounding box coordinates, one objectness score, and 80 class scores.

Therefore, to utilize the deployed OFA-YOLO network on the DPU, the input image should be preprocessed (scaling and normalization) before quantization to the int8 format. For the output layers, the process should be reversed: the output should be dequantized and scaled from int8 to float. Afterward, the data should be parsed into meaningful bounding box coordinates, objectness scores, and class scores. Information about the scaling, quantization, and dequantization factors, as well as anchor dimensions and the normalization factor, can be retrieved from the input/output tensors after DPU initialization and found in the prototxt file.

input/output tensors
    dpu_runner = vart.Runner.create_runner(subgraphs[0], "run")
    input_tensors = dpu_runner.get_input_tensors()
    output_tensors = dpu_runner.get_output_tensors()
    print(input_tensors[0])
    print(output_tensors[0])
    print(output_tensors[1])
    print(output_tensors[2])

    {name: 'ofa_yolo_50__ofa_yolo_50_QuantStub_quant__input_1_fix', shape: [1, 640, 640, 3], type: 'xint8', attrs: {'location': 1, 'ddr_addr': 3872, 'reg_id': 2, 'fix_point': 6, 'if_signed': True, 'round_mode': 'DPU_ROUND', 'bit_width': 8}}

    {name: 'ofa_yolo_50__ofa_yolo_50_Model_model__Conv2d_module_240__ip_1_fix', shape: [1, 80, 80, 255], type: 'xint8', attrs: {'location': 1, 'ddr_addr': 0, 'reg_id': 3, 'fix_point': 3, 'if_signed': True, 'bit_width': 8, 'round_mode': 'DPU_ROUND'}}
    {name: 'ofa_yolo_50__ofa_yolo_50_Model_model__Conv2d_module_241__ip_3_fix', shape: [1, 40, 40, 255], type: 'xint8', attrs: {'location': 1, 'ddr_addr': 1632000, 'bit_width': 8, 'round_mode': 'DPU_ROUND', 'reg_id': 3, 'fix_point': 4, 'if_signed': True}}
    {name: 'ofa_yolo_50__ofa_yolo_50_Model_model__Conv2d_module_242__ip_fix', shape: [1, 20, 20, 255], type: 'xint8', attrs: {'location': 1, 'ddr_addr': 2040000, 'reg_id': 3, 'fix_point': 4, 'round_mode': 'DPU_ROUND', 'bit_width': 8, 'if_signed': True}}
ofa_yolo_pt.prototxt
model {
  kernel {
     mean: 0.0
     mean: 0.0
     mean: 0.0
     scale: 0.00392156
     scale: 0.00392156
     scale: 0.00392156
  }
  model_type : YOLOv5
  yolo_v5_param {
    stride:8
    stride:16
    stride:32
    max_boxes_num:30000
    max_nms_num:300
    yolo_param {
      num_classes: 80
    anchorCnt: 3
    layer_name: "_242__"
    layer_name: "_241__"
    layer_name: "_240__"
    conf_threshold: 0.5
    nms_threshold: 0.65
    biases: 10
    biases: 13
    biases: 16
    biases: 30
    biases: 33
    biases: 23
    biases: 30
    biases: 61
    biases: 62
    biases: 45
    biases: 59
    biases: 119
    biases: 116
    biases: 90
    biases: 156
    biases: 198
    biases: 373
    biases: 326
    test_mAP: false
  }
}
}
After parsing and thresholding the data in the output layers based on the confidence threshold, Non-Maximum Suppression (NMS) should be applied to remove redundant boxes according to the predefined NMS threshold.
Show Python Code
def sigmoid(x):
    return 1 / (1 + np.exp(-x))

def calculate_iou(box1, box2):
    x1, y1, x2, y2 = box1
    x1_b, y1_b, x2_b, y2_b = box2
    inter_x1 = max(x1, x1_b)
    inter_y1 = max(y1, y1_b)
    inter_x2 = min(x2, x2_b)
    inter_y2 = min(y2, y2_b)
    inter_area = max(0, inter_x2 - inter_x1) * max(0, inter_y2 - inter_y1)
    box1_area = (x2 - x1) * (y2 - y1)
    box2_area = (x2_b - x1_b) * (y2_b - y1_b)
    union_area = box1_area + box2_area - inter_area
    return inter_area / union_area if union_area > 0 else 0

decoded_boxes = []
for layer_idx, output in enumerate(reshaped_outputs):
	grid_height, grid_width, num_anchors, _ = output.shape
	anchors_layer = np.array(anchors[layer_idx]).reshape(-1, 2)
	tx, ty, tw, th, confidence = np.split(output[..., :5], 5, axis=-1)
	class_scores = output[..., 5:]
	confidence = sigmoid(confidence)
	class_scores = sigmoid(class_scores)
	for h in range(grid_height):
		for w in range(grid_width):
			for anchor_idx in range(num_anchors):

				tx_val = tx[h, w, anchor_idx]
				ty_val = ty[h, w, anchor_idx]
				tw_val = tw[h, w, anchor_idx]
				th_val = th[h, w, anchor_idx]
				conf_val = confidence[h, w, anchor_idx]

				if conf_val <= conf_threshold:
					continue


				bx = (w + sigmoid(tx_val)) / grid_width
				by = (h + sigmoid(ty_val)) / grid_height
				bw = np.exp(tw_val) * anchors_layer[anchor_idx, 0] / 640
				bh = np.exp(th_val) * anchors_layer[anchor_idx, 1] / 640


				x_min = (bx - bw / 2) * 640
				y_min = (by - bh / 2) * 640
				x_max = (bx + bw / 2) * 640
				y_max = (by + bh / 2) * 640


				class_probs = class_scores[h, w, anchor_idx, :]


				decoded_boxes.append({
					"box": [x_min, y_min, x_max, y_max],
					"confidence": conf_val,
					"class_probs": class_probs,
				})

decoded_boxes.sort(key=lambda x: x["confidence"], reverse=True)
nms_boxes = []
while decoded_boxes:
	best_box = decoded_boxes.pop(0)
	nms_boxes.append(best_box)
	decoded_boxes = [
		box for box in decoded_boxes if calculate_iou(best_box["box"], box["box"]) < nms_threshold
	]
Last but not least, the box coordinates should be scaled back to the original image size during rendering.
Show Python Code
image_height, image_width = frame_raw.shape[:2]
scale_x = 640 / image_width
scale_y = 640 / image_height
pad_x = (640 - image_width * scale_x) / 2
pad_y = (640 - image_height * scale_y) / 2
for detection in nms_boxes:
	x_min, y_min, x_max, y_max = detection["box"]
	x_min = max(0, int((x_min - pad_x) / scale_x))
	y_min = max(0, int((y_min - pad_y) / scale_y))
	x_max = min(image_width, int((x_max - pad_x) / scale_x))
	y_max = min(image_height, int((y_max - pad_y) / scale_y))
	confidence = float(detection["confidence"])
	class_probs = detection["class_probs"]
	class_id = int(np.argmax(class_probs))
	label = f"Class {class_id} ({confidence:.2f})"
	cv2.rectangle(frame_raw, (int(x_min), int(y_min)), (int(x_max), int(y_max)), (0, 255, 0), 2)
	cv2.putText(frame_raw, label, (int(x_min), int(y_min - 10)), cv2.FONT_HERSHEY_SIMPLEX, 0.5, (0, 0, 255), 1)
Thus, the structure of a Python class utilizing the algorithms mentioned above can be represented by the following image:

Initialization (__init__):
Configures anchors and model-specific parameters such as strides, scaling factors, and fixed-point adjustments.
Sets thresholds for confidence and Non-Maximum Suppression (NMS).
Prepares internal structures for input and output tensor management.
Preprocessing (preprocess):
Resizes and normalizes input images.
Quantizes the image into INT8 format based on the fixed-point scaling factor of the input tensor.
Inference (run_dpu):
Feeds the preprocessed input into the DPU runner.
Executes the inference asynchronously and retrieves the raw outputs from the DPU.
Postprocessing (postprocess):
Dequantizes and decodes the raw DPU outputs into bounding box coordinates, confidence scores, and class probabilities.
Filters detections based on the confidence threshold and applies NMS to eliminate overlapping boxes.
Visualization (draw_detections):
Maps the decoded coordinates back to the original image dimensions
Draws bounding boxes, class labels, and confidence scores for visualization.
Performance evaluation was conducted across three OFA-YOLO models: the full model and two pruned models with 30% and 50% sparsity.

The accuracy metrics, such as Average Precision (AP) and Average Recall (AR), were calculated using standard COCO metrics with the pycocotools library. The results confirmed that the full model (ofa_yolo_pt) clearly outperforms the pruned models in both AP and AR across all object sizes. This aligns with expectations, as pruning reduces model size but negatively impacts detection performance, particularly for small and medium objects.

For throughput estimation, I evaluated both my Python multithreaded implementation of OFA-YOLO and a multithreaded C++ example from the Vitis AI Xilinx GitHub repository using the same three models. The C++ implementation demonstrates reduced inference time—approximately 20 milliseconds less per model—compared to the Python implementation. The Inference Time - time required to upload data into DPU runner and retrieve it back.
As a result, the C++ implementation achieves higher throughput than the Python implementation. Consistent with expectations, pruning improves throughput due to the smaller model size, but this comes at the cost of reduced accuracy.

Below, I provide the Python code for the non-optimized version of the OFA-YOLO detector, using a USB camera as the input video source. This implementation has low throughput (about 10 times slower compared to the multithreading implementation) and lower accuracy. As a challenge, you may try to optimize it yourself, or alternatively, you can request the ready-to-use multithreading implementation, including accuracy estimation, from me. This optimized version will definitely save you time and effort.

Python Code for non optimized ofa-yolo detector
import cv2
import numpy as np
import vart
import xir
import math
import time

def sigmoid(x):
        return 1 / (1 + np.exp(-x))

def calculate_iou(box1, box2):
    x1, y1, x2, y2 = box1
    x1_b, y1_b, x2_b, y2_b = box2
    inter_x1 = max(x1, x1_b)
    inter_y1 = max(y1, y1_b)
    inter_x2 = min(x2, x2_b)
    inter_y2 = min(y2, y2_b)
    inter_area = max(0, inter_x2 - inter_x1) * max(0, inter_y2 - inter_y1)
    box1_area = (x2 - x1) * (y2 - y1)
    box2_area = (x2_b - x1_b) * (y2_b - y1_b)
    union_area = box1_area + box2_area - inter_area
    return inter_area / union_area if union_area > 0 else 0

def get_child_subgraph_dpu(graph):
        root_subgraph = graph.get_root_subgraph()
        child_subgraphs = root_subgraph.toposort_child_subgraph()
        return [cs for cs in child_subgraphs if cs.has_attr("device") and cs.get_attr("device").upper() == "DPU"]

def main():
    model_path = "/home/root/work/B1152/ofa_yolo_pruned_0_50_pt.xmodel"
    anchors = [
        [(10, 13), (16, 30), (33, 23)],
        [(30, 61), (62, 45), (59, 119)],
        [(116, 90), (156, 198), (373, 326)],
    ]
    num_classes = 80
    output_shapes = [(80, 80), (40, 40), (20, 20)]
    scale_factor = 0.00392156
    conf_threshold = 0.2
    nms_threshold = 0.2
    inputId = 0

    cam = cv2.VideoCapture(inputId)
    cam.set(cv2.CAP_PROP_FRAME_WIDTH, 640)
    cam.set(cv2.CAP_PROP_FRAME_HEIGHT, 360)
    if not cam.isOpened():
        print("[ERROR] Failed to open camera ", inputId)
        exit()

    graph = xir.Graph.deserialize(model_path)
    subgraphs = get_child_subgraph_dpu(graph)
    assert len(subgraphs) == 1, "Expected exactly one DPU subgraph."
    dpu_runner = vart.Runner.create_runner(subgraphs[0], "run")

    input_tensors = dpu_runner.get_input_tensors()
    output_tensors = dpu_runner.get_output_tensors()

    fpga_input = [np.empty(input_tensors[0].dims, dtype=np.int8)]
    fpga_output = [np.empty(tuple(tensor.dims[1:]), dtype=np.int8, order="C") for tensor in output_tensors]

    fix_i = 2 ** input_tensors[0].get_attr("fix_point") * scale_factor
    fix_o = [1 / (2 ** tensor.get_attr("fix_point")) for tensor in output_tensors]

    frame_count = 0
    capture_time_total = 0
    preprocess_time_total = 0
    inference_time_total = 0
    postprocess_time_total = 0
    nms_time_total = 0
    draw_time_total = 0
    start_time = time.time()
    try:
        while True:
            capture_start = time.time()
            ret, frame_raw = cam.read()
            capture_end = time.time()
            if not ret:
                break
            capture_time_total += (capture_end - capture_start)

            preprocess_start = time.time()
            frame = cv2.resize(frame_raw, (640, 640), interpolation=cv2.INTER_LINEAR)
            img_quantized = np.round(frame.astype(np.float32) * fix_i).astype(np.int8)
            preprocess_end = time.time()
            preprocess_time_total += (preprocess_end - preprocess_start)

            inference_start = time.time()
            fpga_input[0][0, ...] = img_quantized
            job_id = dpu_runner.execute_async(fpga_input, fpga_output)
            dpu_runner.wait(job_id)
            inference_end = time.time()
            inference_time_total += (inference_end - inference_start)

            postprocess_start = time.time()
            scaled_outputs = [
            (fpga_output[idx].astype(np.float32) * fix_o[idx]).reshape(tuple(tensor.dims))
            for idx, tensor in enumerate(output_tensors)]

            reshaped_outputs = []
            for idx, scaled_output in enumerate(scaled_outputs):
                grid_height, grid_width = output_shapes[idx]
                expected_shape = (grid_height, grid_width, len(anchors[idx]), 5 + num_classes)
                reshaped_outputs.append(scaled_output.reshape(expected_shape))

            decoded_boxes = []
            for layer_idx, output in enumerate(reshaped_outputs):
                grid_height, grid_width, num_anchors, _ = output.shape
                anchors_layer = np.array(anchors[layer_idx]).reshape(-1, 2)
                tx, ty, tw, th, confidence = np.split(output[..., :5], 5, axis=-1)
                class_scores = output[..., 5:]
                confidence = sigmoid(confidence)
                class_scores = sigmoid(class_scores)
                for h in range(grid_height):
                    for w in range(grid_width):
                        for anchor_idx in range(num_anchors):

                            tx_val = tx[h, w, anchor_idx]
                            ty_val = ty[h, w, anchor_idx]
                            tw_val = tw[h, w, anchor_idx]
                            th_val = th[h, w, anchor_idx]
                            conf_val = confidence[h, w, anchor_idx]

                            if conf_val <= conf_threshold:
                                continue


                            bx = (w + sigmoid(tx_val)) / grid_width
                            by = (h + sigmoid(ty_val)) / grid_height
                            bw = np.exp(tw_val) * anchors_layer[anchor_idx, 0] / 640
                            bh = np.exp(th_val) * anchors_layer[anchor_idx, 1] / 640


                            x_min = (bx - bw / 2) * 640
                            y_min = (by - bh / 2) * 640
                            x_max = (bx + bw / 2) * 640
                            y_max = (by + bh / 2) * 640


                            class_probs = class_scores[h, w, anchor_idx, :]


                            decoded_boxes.append({
                                "box": [x_min, y_min, x_max, y_max],
                                "confidence": conf_val,
                                "class_probs": class_probs,
                            })
            postprocess_end = time.time()
            postprocess_time_total += (postprocess_end - postprocess_start)
            nms_start = time.time()
            decoded_boxes.sort(key=lambda x: x["confidence"], reverse=True)
            nms_boxes = []
            while decoded_boxes:
                best_box = decoded_boxes.pop(0)
                nms_boxes.append(best_box)
                decoded_boxes = [
                    box for box in decoded_boxes if calculate_iou(best_box["box"], box["box"]) < nms_threshold
                ]
            nms_end = time.time()
            nms_time_total += (nms_end - nms_start)
            draw_start = time.time()
            image_height, image_width = frame_raw.shape[:2]
            scale_x = 640 / image_width
            scale_y = 640 / image_height
            pad_x = (640 - image_width * scale_x) / 2
            pad_y = (640 - image_height * scale_y) / 2
            for detection in nms_boxes:
                x_min, y_min, x_max, y_max = detection["box"]
                x_min = max(0, int((x_min - pad_x) / scale_x))
                y_min = max(0, int((y_min - pad_y) / scale_y))
                x_max = min(image_width, int((x_max - pad_x) / scale_x))
                y_max = min(image_height, int((y_max - pad_y) / scale_y))
                confidence = float(detection["confidence"])
                class_probs = detection["class_probs"]
                class_id = int(np.argmax(class_probs))
                label = f"Class {class_id} ({confidence:.2f})"
                cv2.rectangle(frame_raw, (int(x_min), int(y_min)), (int(x_max), int(y_max)), (0, 255, 0), 2)
                cv2.putText(frame_raw, label, (int(x_min), int(y_min - 10)), cv2.FONT_HERSHEY_SIMPLEX, 0.5, (0, 0, 255), 1)
            draw_end = time.time()
            draw_time_total += (draw_end - draw_start)
            frame_count += 1
            current_time = time.time()
            elapsed_time = current_time - start_time
            fps = frame_count / elapsed_time
            cv2.putText(frame_raw, f"FPS: {fps:.2f}", (10, 20), cv2.FONT_HERSHEY_SIMPLEX, 0.5, (20, 20, 180), 2)
            cv2.imshow("Non-optimized ofa-yolo detector", frame_raw)
            key = cv2.waitKey(1) & 0xFF
            if key == 27:  # Press 'ESC' to exit
                break
    finally:
        cam.release()
        cv2.destroyAllWindows()
        print("\n[INFO] Average Timings per Frame (in ms):")
        print(f"[INFO] {'Frame Capture:':<20} {capture_time_total / frame_count * 1000:.2f} ms")
        print(f"[INFO] {'Preprocessing:':<20} {preprocess_time_total / frame_count * 1000:.2f} ms")
        print(f"[INFO] {'Run DPU:':<20} {inference_time_total / frame_count * 1000:.2f} ms")
        print(f"[INFO] {'Postprocessing:':<20} {postprocess_time_total / frame_count * 1000:.2f} ms")
        print(f"[INFO] {'NMS filtering:':<20} {nms_time_total / frame_count * 1000:.2f} ms")
        print(f"[INFO] {'Rendering/Draw:':<20} {draw_time_total / frame_count * 1000:.2f} ms")
        print(f"[INFO] {'Overall FPS:':<20} {fps:.2f}")

if __name__ == "__main__":
    main()
Conclusion. In this section, I explored the Python implementation of the OFA-YOLO network from the Vitis AI 3.0 Model Zoo, optimized for real-time object detection on the DPUCZDX8G Deep Learning Processing Unit. By integrating essential functionalities such as image preprocessing, data inference, and output parsing with non-maximum suppression, this implementation provides a robust solution for embedded systems. I also evaluated the accuracy of the model using the COCO dataset and presented performance benchmarks, comparing both the full and pruned network versions, as well as throughput results for the multithreaded Python implementation and the C++ implementation from Xilinx Vitis AI.
The tests were conducted on the Trenz TE0820-03-2AI21FA module with a Logitech C270 USB camera, demonstrating the potential of the OFA-YOLO network for embedded real-time object detection. While the optimized multithreading implementation provides a significant performance boost, you have the option to either use the free, non-optimized version available on this webpage or request the ready-to-use, optimized implementation with accuracy estimation to save time and effort.
By following the guidance and resources provided, you can accelerate your deep learning projects on Zynq Ultrascale+ MPSoCs and efficiently deploy the OFA-YOLO network in real-world applications. For further assistance and to obtain the optimized resources, feel free to contact me.